GCC e-Invoice for WooCommerce (KSA ZATCA Phase 1) Documentation
Welcome to the documentation for GCC e-Invoice for WooCommerce (KSA ZATCA Phase 1). This guide will help you install the plugin, configure the required settings, and understand how invoices and credit notes work in both the admin area and the customer-facing pages.
Table of Contents
1. Overview
GCC e-Invoice for WooCommerce (KSA ZATCA Phase 1) helps you generate and manage invoice documents directly from your store. It also supports customer access to invoices and, when applicable, credit notes.
2. Requirements
Before installing GCC e-Invoice for WooCommerce (KSA ZATCA Phase 1), please make sure your website meets the following minimum requirements:
- WordPress: 6.9 or later
- WooCommerce: 10.2.4 or later
- PHP: 7.4 or later
The plugin has been tested up to WooCommerce 10.2.4 and includes Arabic/English support, local PDF generation, TLV QR support, and ZATCA Phase 1 invoice and credit note generation.
3. Installation
3.1 Extract the main package
After downloading the main package from CodeCanyon, extract it first to access the plugin files included in the package. This will create an extracted folder containing the installable plugin ZIP file and the documentation.
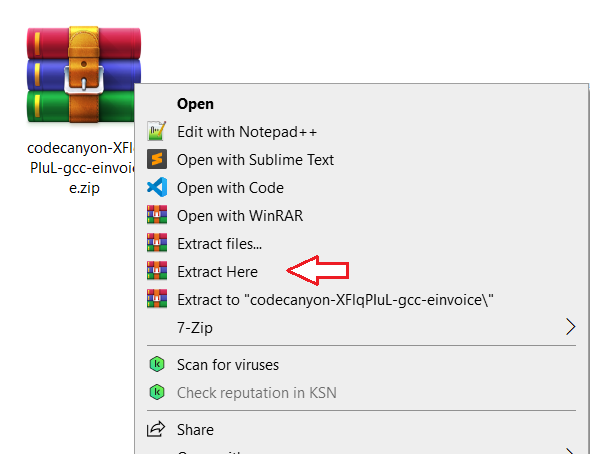
3.2 Locate the plugin ZIP file
After extracting the main package, locate the installable plugin ZIP file named gcc-einvoice.zip.
This is the file you should upload to your website. Do not upload the full CodeCanyon package ZIP directly.

gcc-einvoice.zip.
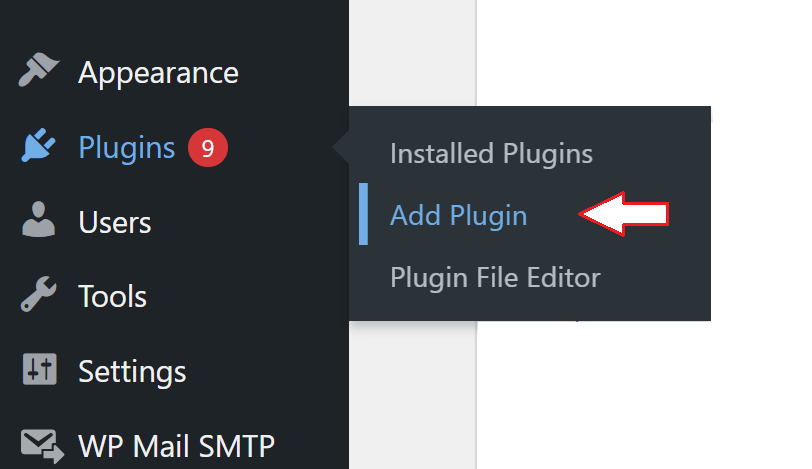
3.3 Go to Plugins > Add Plugin
Log in to your WordPress dashboard, open Plugins, and click Add Plugin.
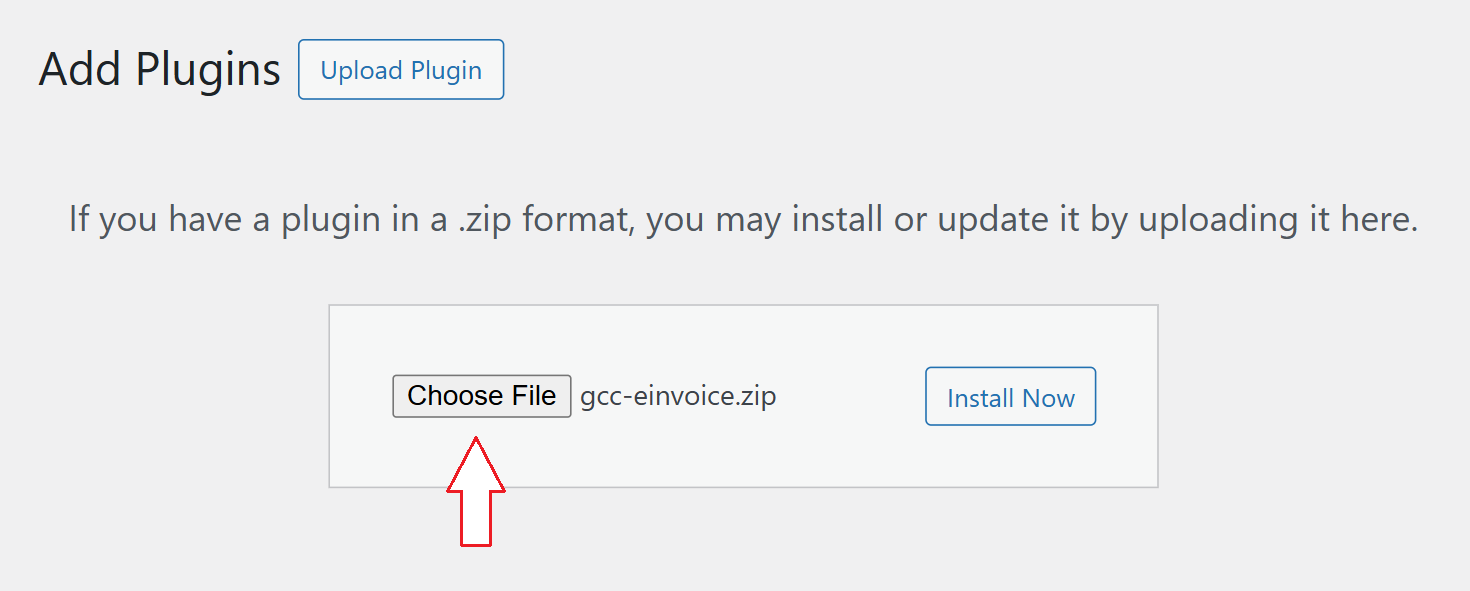
3.4 Click Upload Plugin and choose the ZIP file
On the Add Plugins page, click Upload Plugin, then choose the installable file gcc-einvoice.zip from your computer.
gcc-einvoice.zip.
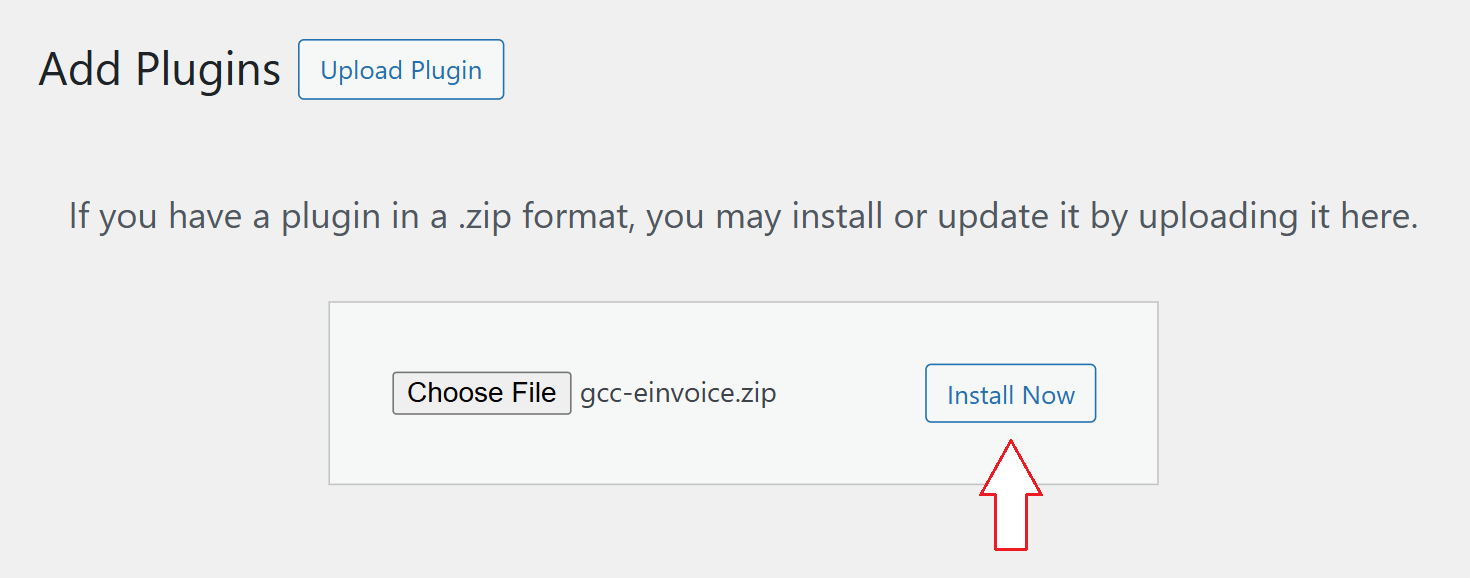
3.5 Click Install Now
After selecting the plugin ZIP file, click Install Now and wait for WordPress to finish installing the plugin.
Alternative manual installation (only if dashboard upload fails)
If your hosting environment does not allow plugin ZIP uploads from the WordPress dashboard, you can install the plugin manually using your hosting file manager or FTP.
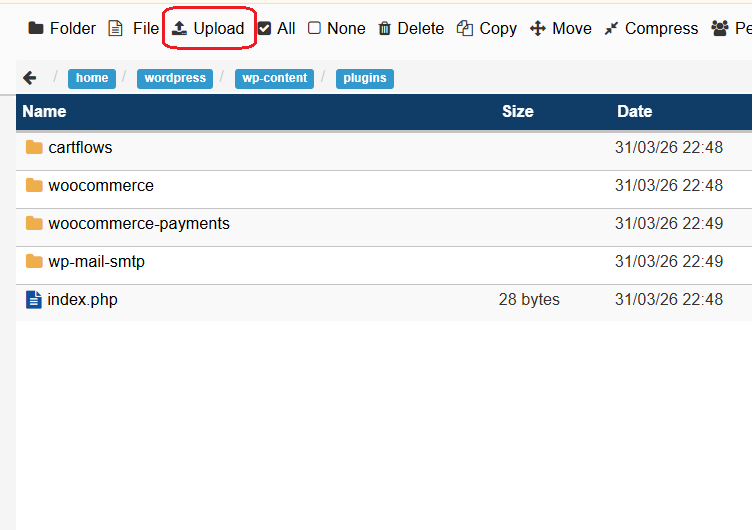
Manual step A: Upload the plugin ZIP to the plugins folder
Open your hosting file manager and go to the /wp-content/plugins folder. Then upload the installable plugin ZIP file, gcc-einvoice.zip, to this location.
gcc-einvoice.zip to the /wp-content/plugins folder.
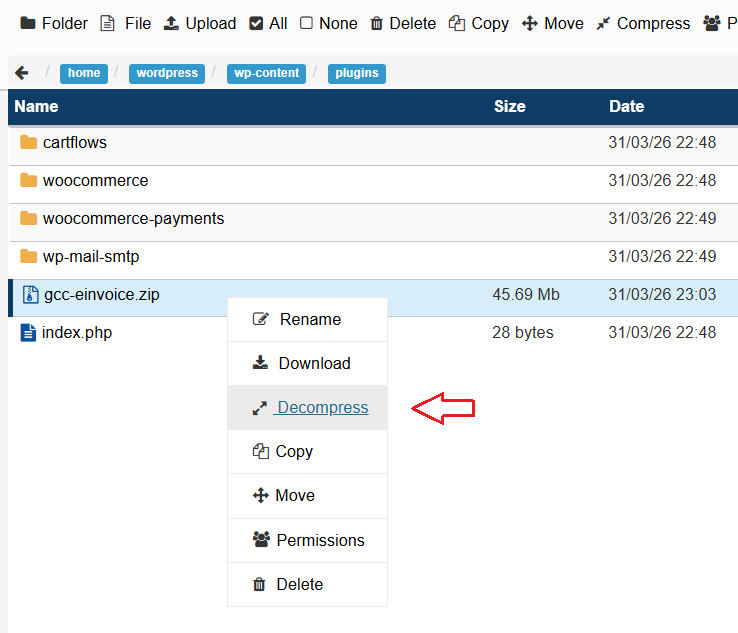
Manual step B: Extract the ZIP file
After uploading gcc-einvoice.zip, extract it in the same /wp-content/plugins folder. This will create the plugin folder needed for WordPress to recognize the plugin correctly.
gcc-einvoice.zip in the same plugins folder.
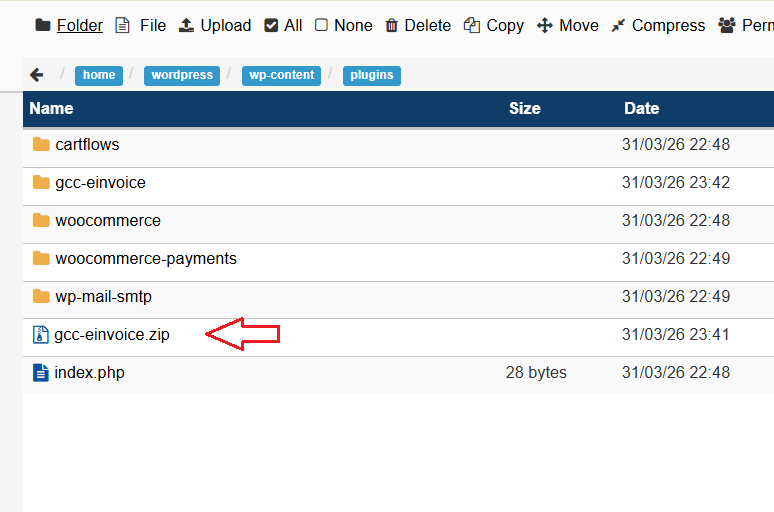
Manual step C: Confirm the plugin folder is created
After extraction, the gcc-einvoice folder should appear inside the /wp-content/plugins directory. You can keep or delete the uploaded ZIP file afterward, since the plugin files are already extracted.
gcc-einvoice folder has been created.
4. Activation
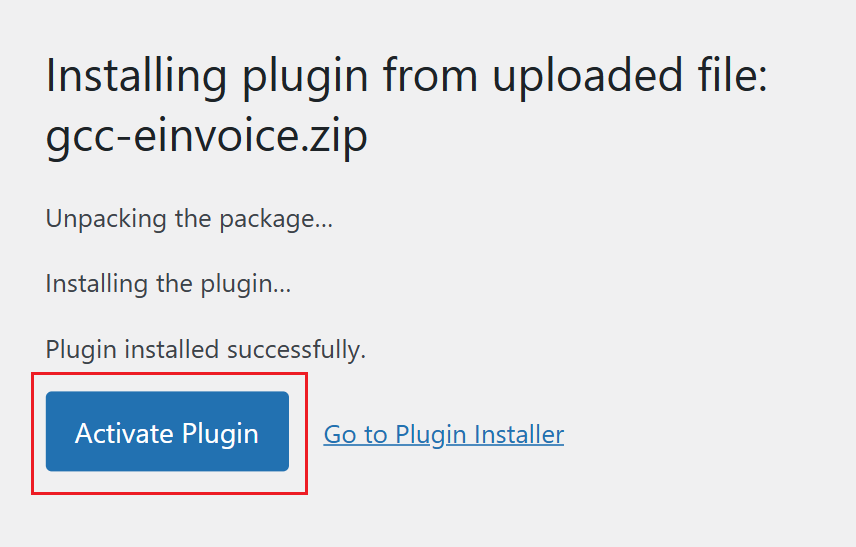
4.1 Activate the plugin after installation
When WordPress finishes installing the plugin, click Activate Plugin to enable it immediately.
4.2 Alternative way to activate the plugin
If you leave the installation screen, you can still activate the plugin later from the Plugins page in your WordPress dashboard.

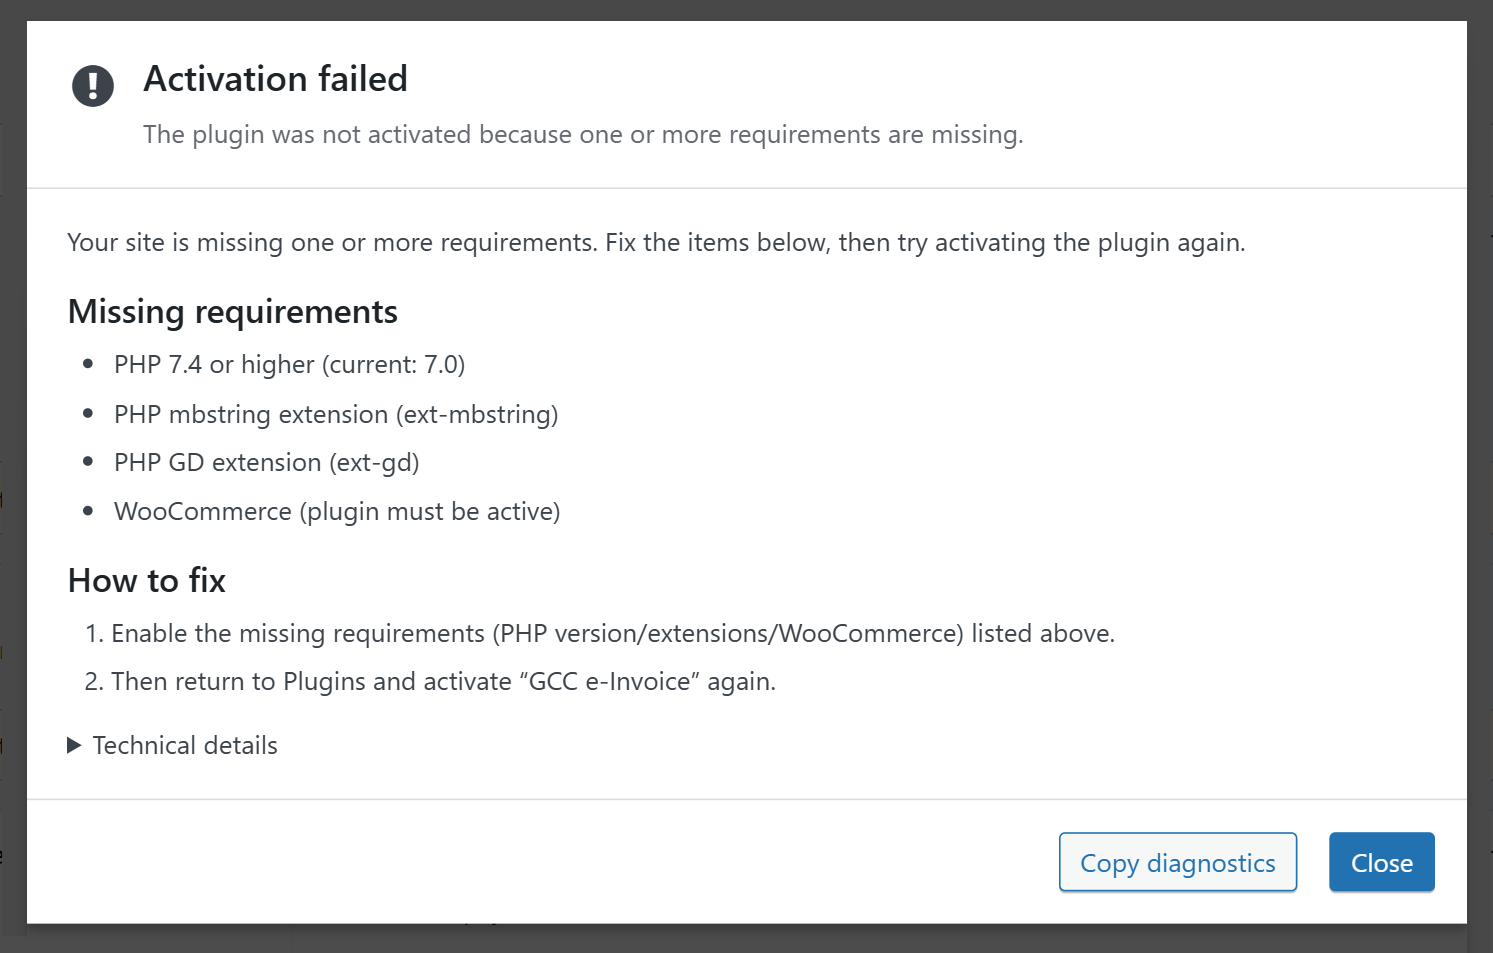
4.3 Missing requirements during activation
If the plugin detects missing server or plugin requirements during activation, it will display a message explaining what needs to be fixed. Review the listed items, update your environment if needed, and then try activating the plugin again.
4.4 Open the plugin settings
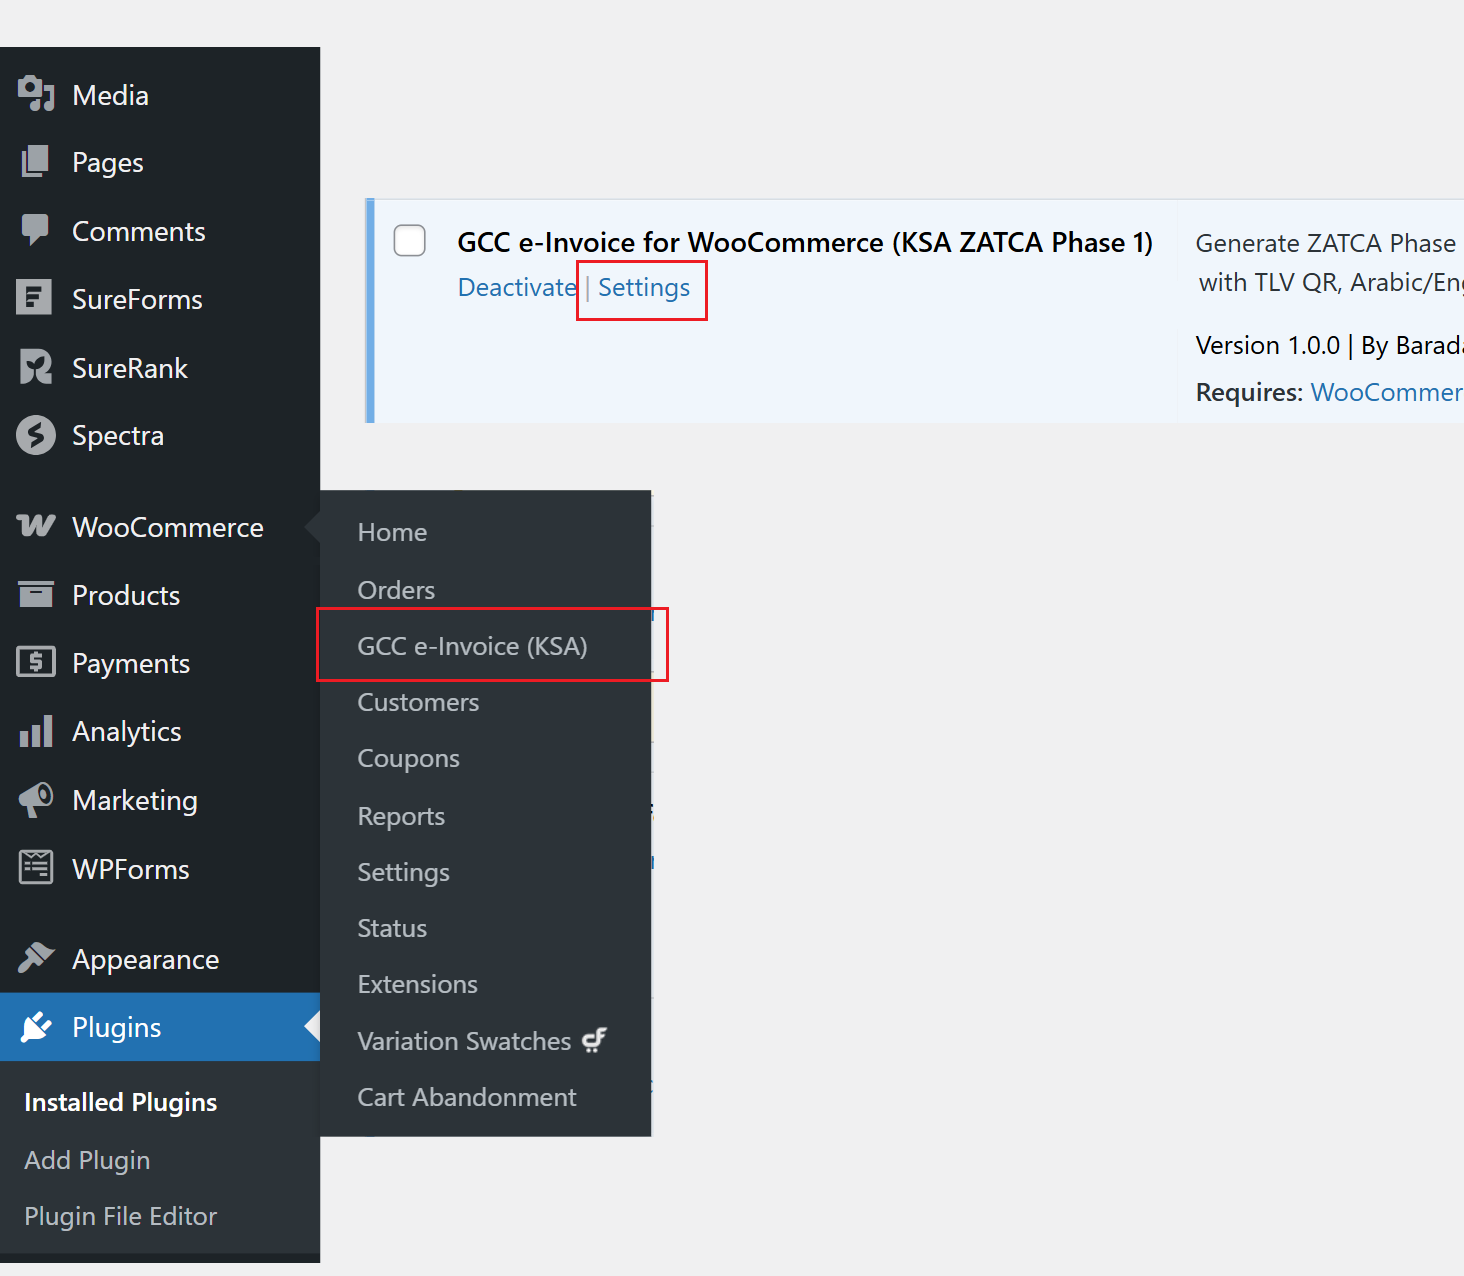
After activation, you can open the plugin settings in two ways. You can click Settings from the Plugins page, or open WooCommerce > GCC e-Invoice (KSA) from the WordPress admin menu.
5. Plugin Settings
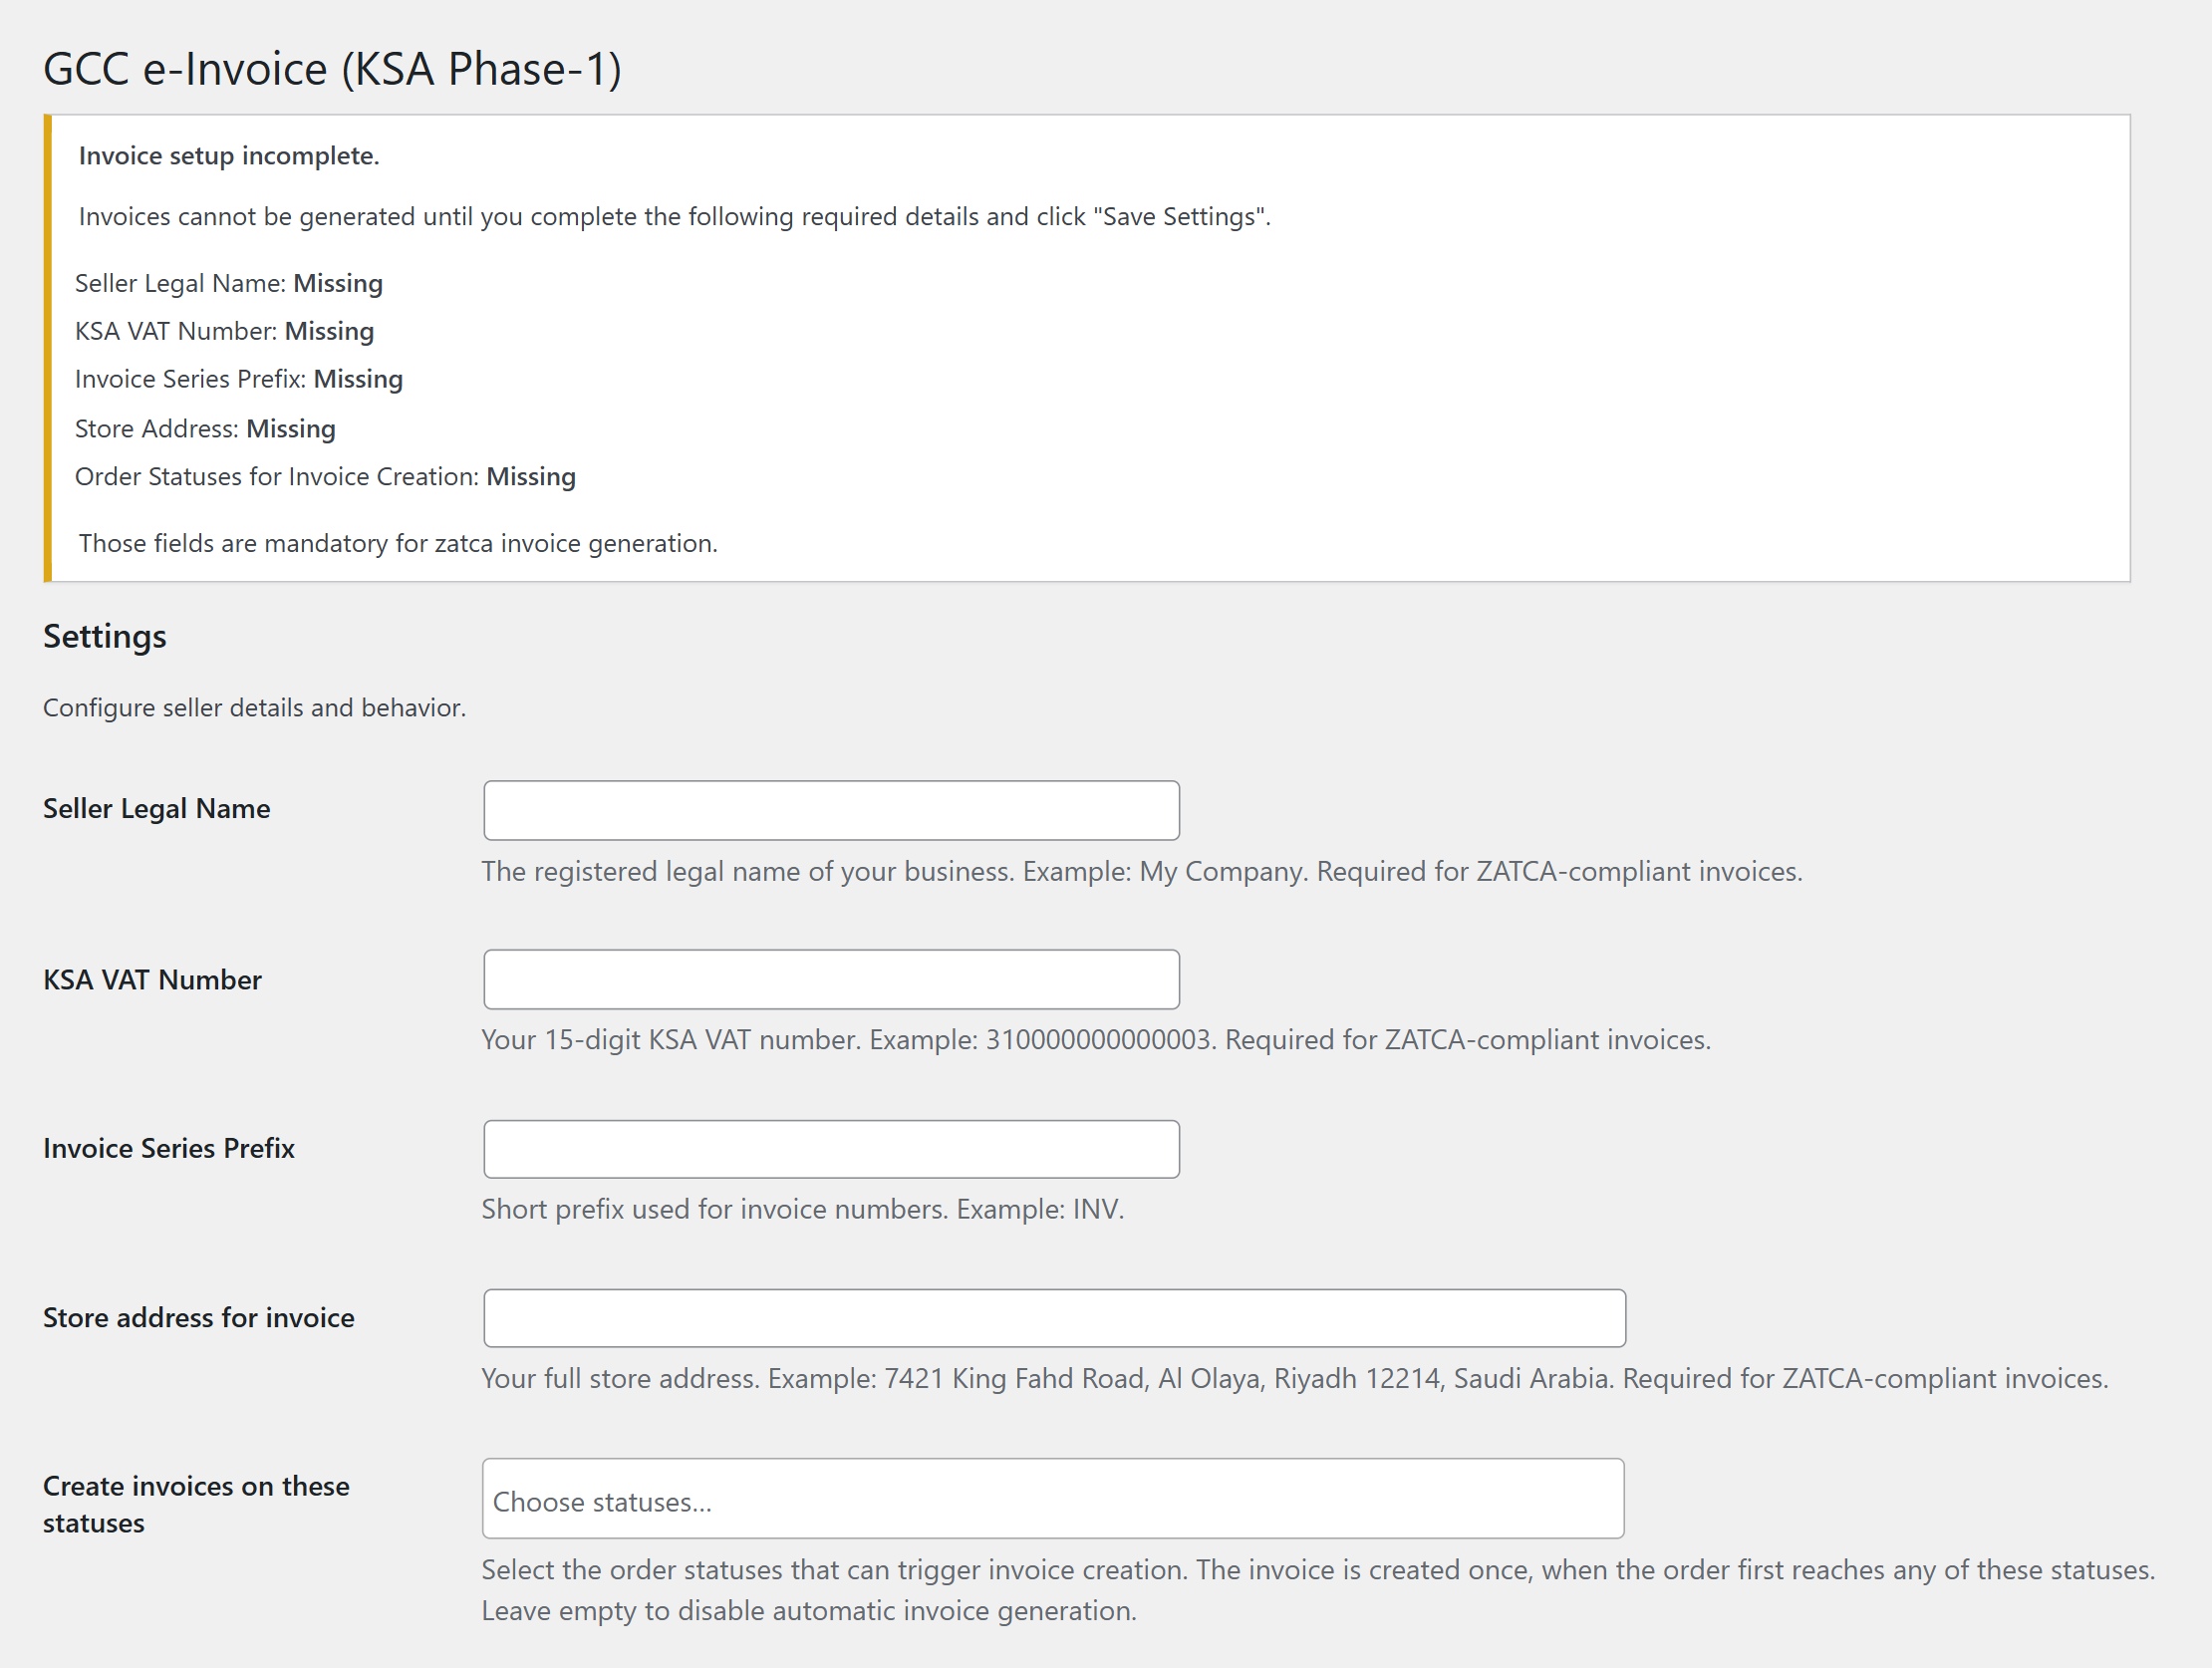
5.1 Complete the required fields
To enable invoice generation, complete the required settings fields first. These fields include the seller information, invoice prefix, store address, and the order statuses that should trigger invoice creation.
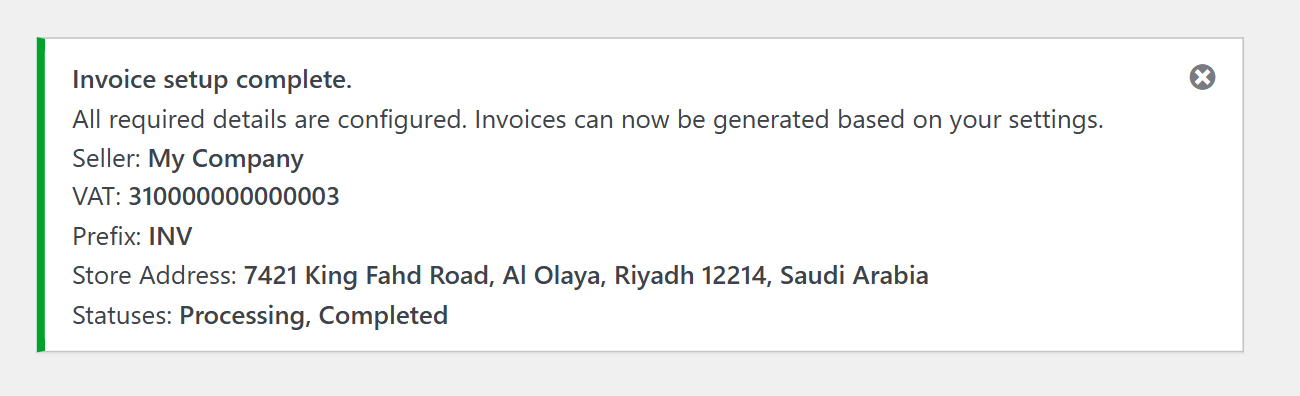
5.2 Save the settings successfully
Once all required fields are completed, click Save Settings to store the configuration. If everything is entered correctly, the plugin will display a confirmation message showing that invoice generation is ready.
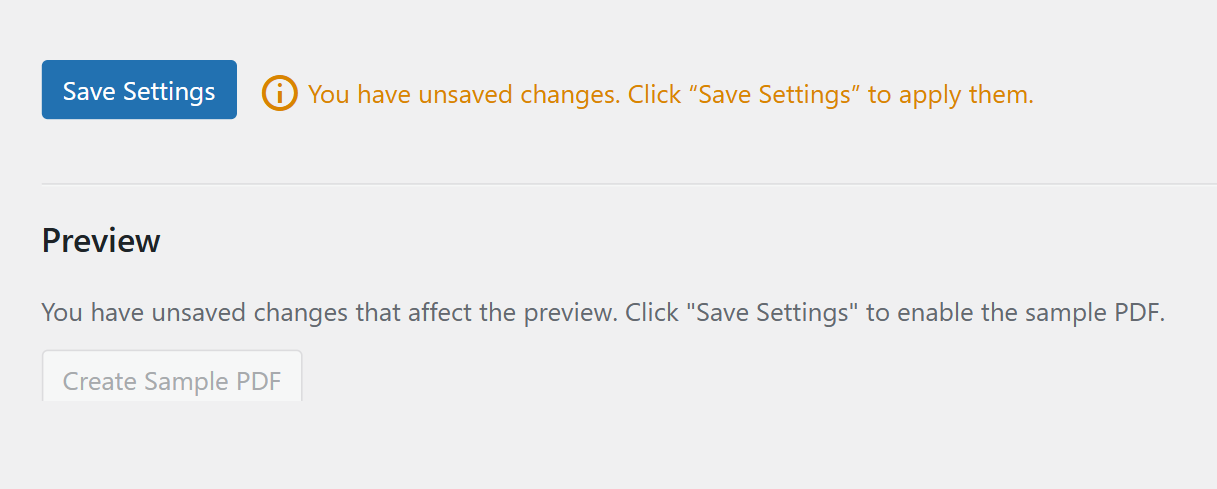
5.3 Save changes before previewing
If you change any invoice-related setting, save the configuration again before using the preview. Until the changes are saved, the sample PDF preview remains disabled.
6. Admin Usage
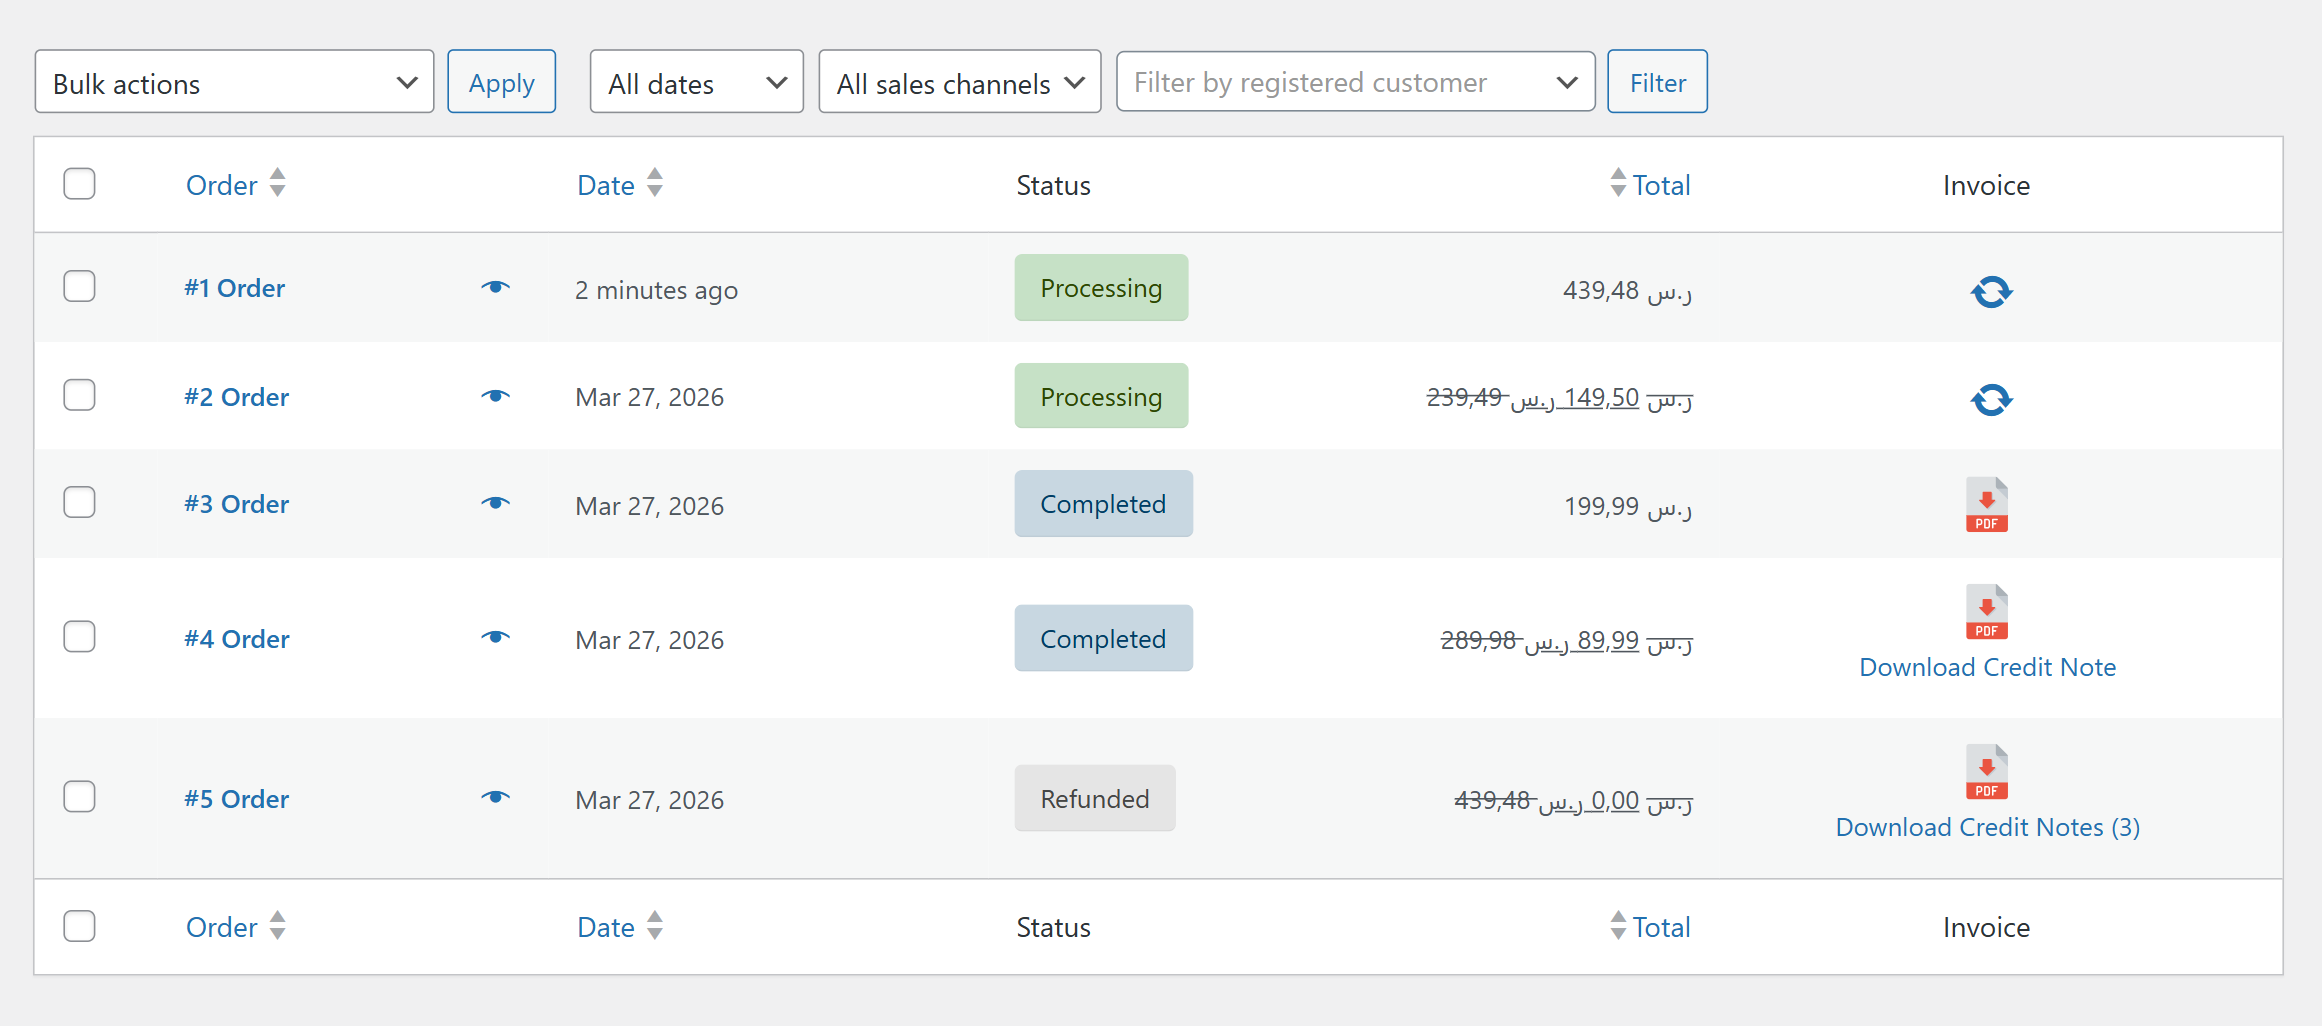
6.1 Invoice actions from the orders list
The plugin adds invoice actions directly to the WooCommerce orders list, making it easy to generate or download invoice files for both new and existing orders. For refunded orders, the same action can also generate the related credit note files.
- Click the generate icon to create the invoice for an order.
- If the order includes a refund, the same action will generate both the invoice and the related credit note files.
- You can use this for current orders as well as older existing orders.
- Click the PDF icon to download the invoice file.
- If an order has one credit note, clicking the credit note link downloads a single PDF file.
- If an order has multiple credit notes, they are downloaded together as a ZIP file, with each credit note kept as a separate PDF.
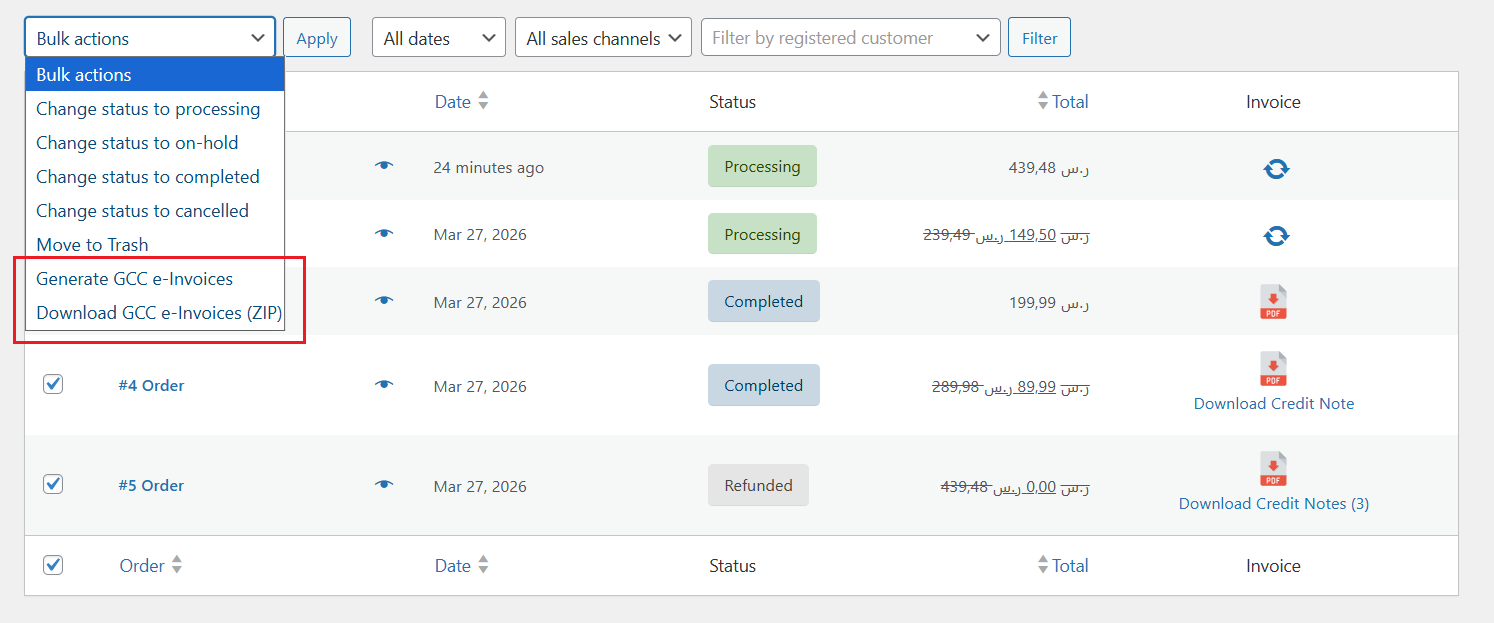
6.2 Bulk actions
You can also use WooCommerce bulk actions to generate or download invoice files for multiple orders at once. Select the orders you want to process, choose the required bulk action, and click Apply.
- Generate GCC e-Invoices creates invoice and credit notes for the selected orders.
- Download GCC e-Invoices (ZIP) downloads the generated invoice files and credit notes for the selected orders as a ZIP archive.
7. Customer Front-End Experience
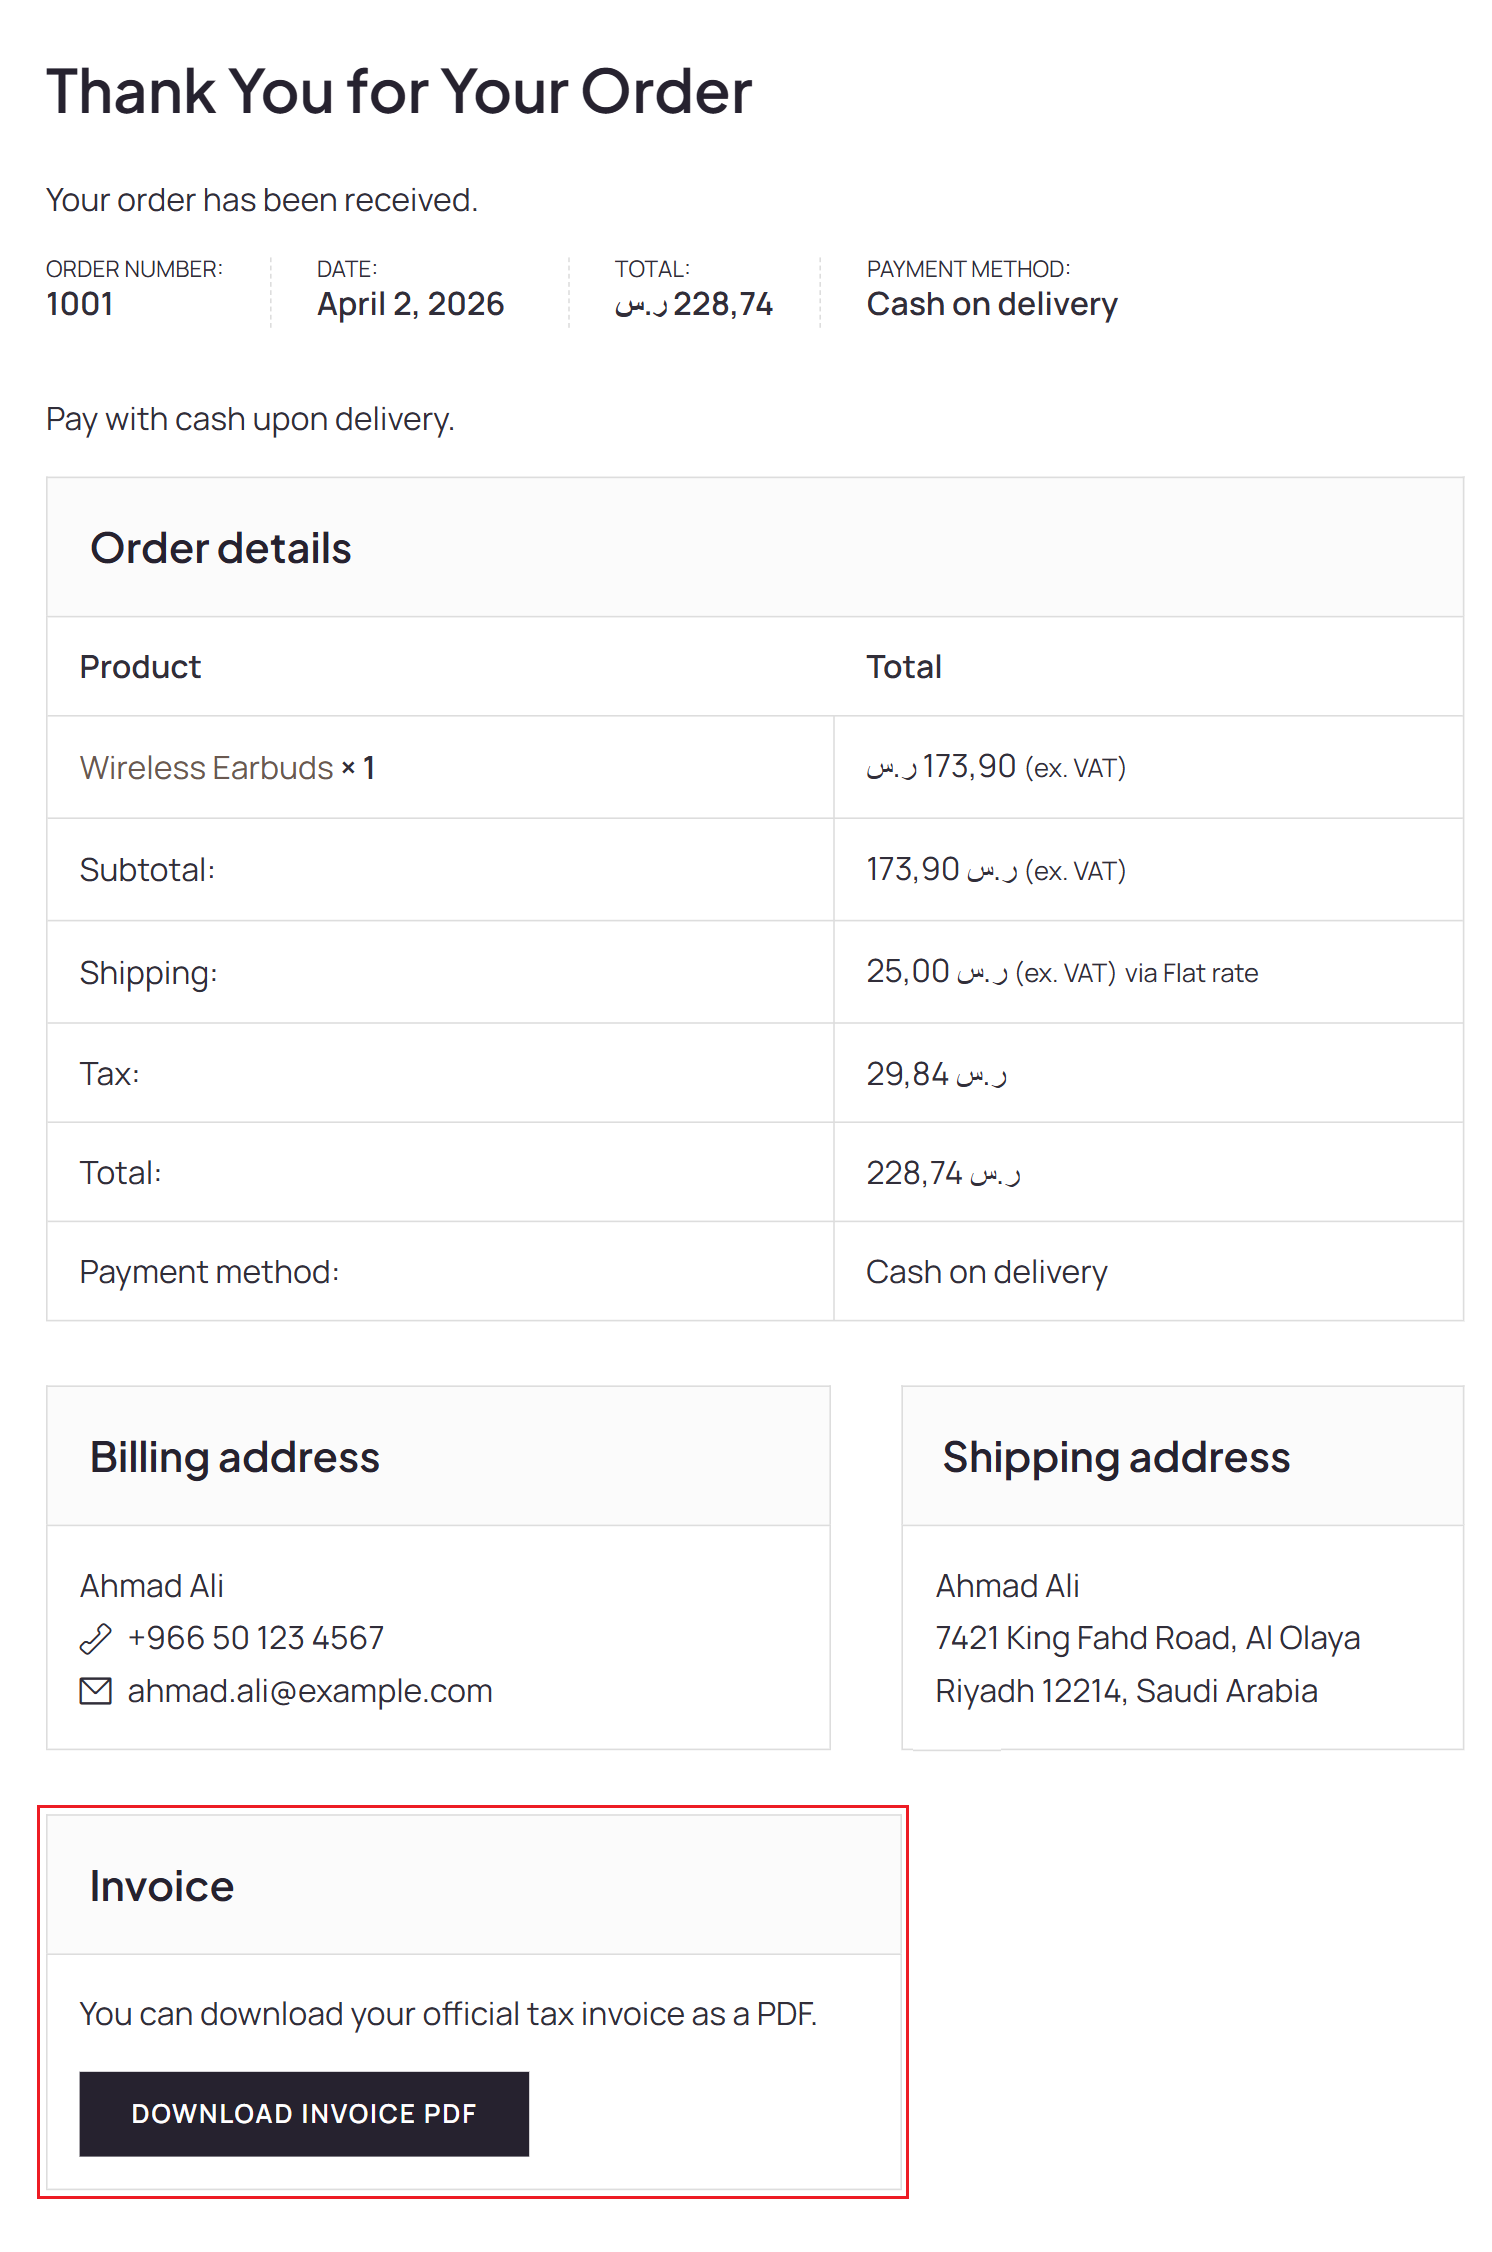
7.1 Invoice on the Thank You page
If this option is enabled in the plugin settings, an Invoice section will appear on the Thank You page after the customer places an order. From this section, the customer can download the invoice PDF directly from the order confirmation page.
7.2 Invoice from My Account > Orders
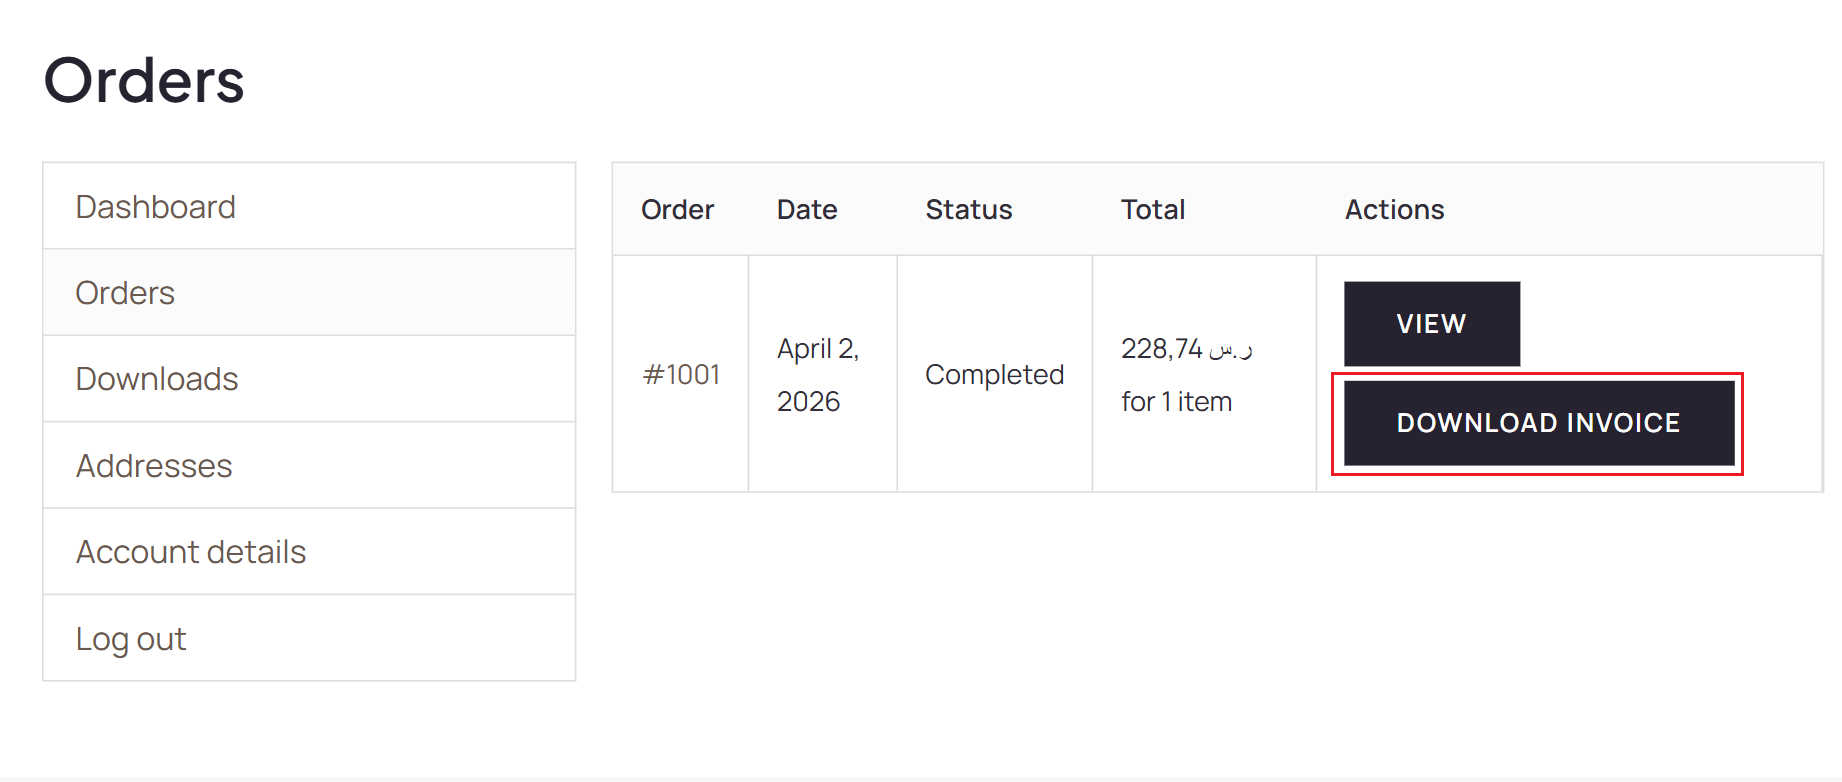
Customers can also download their invoice directly from the My Account > Orders page. When an invoice is available for an order, a Download Invoice button appears in the actions column, allowing the customer to download the PDF without opening the full order details page.
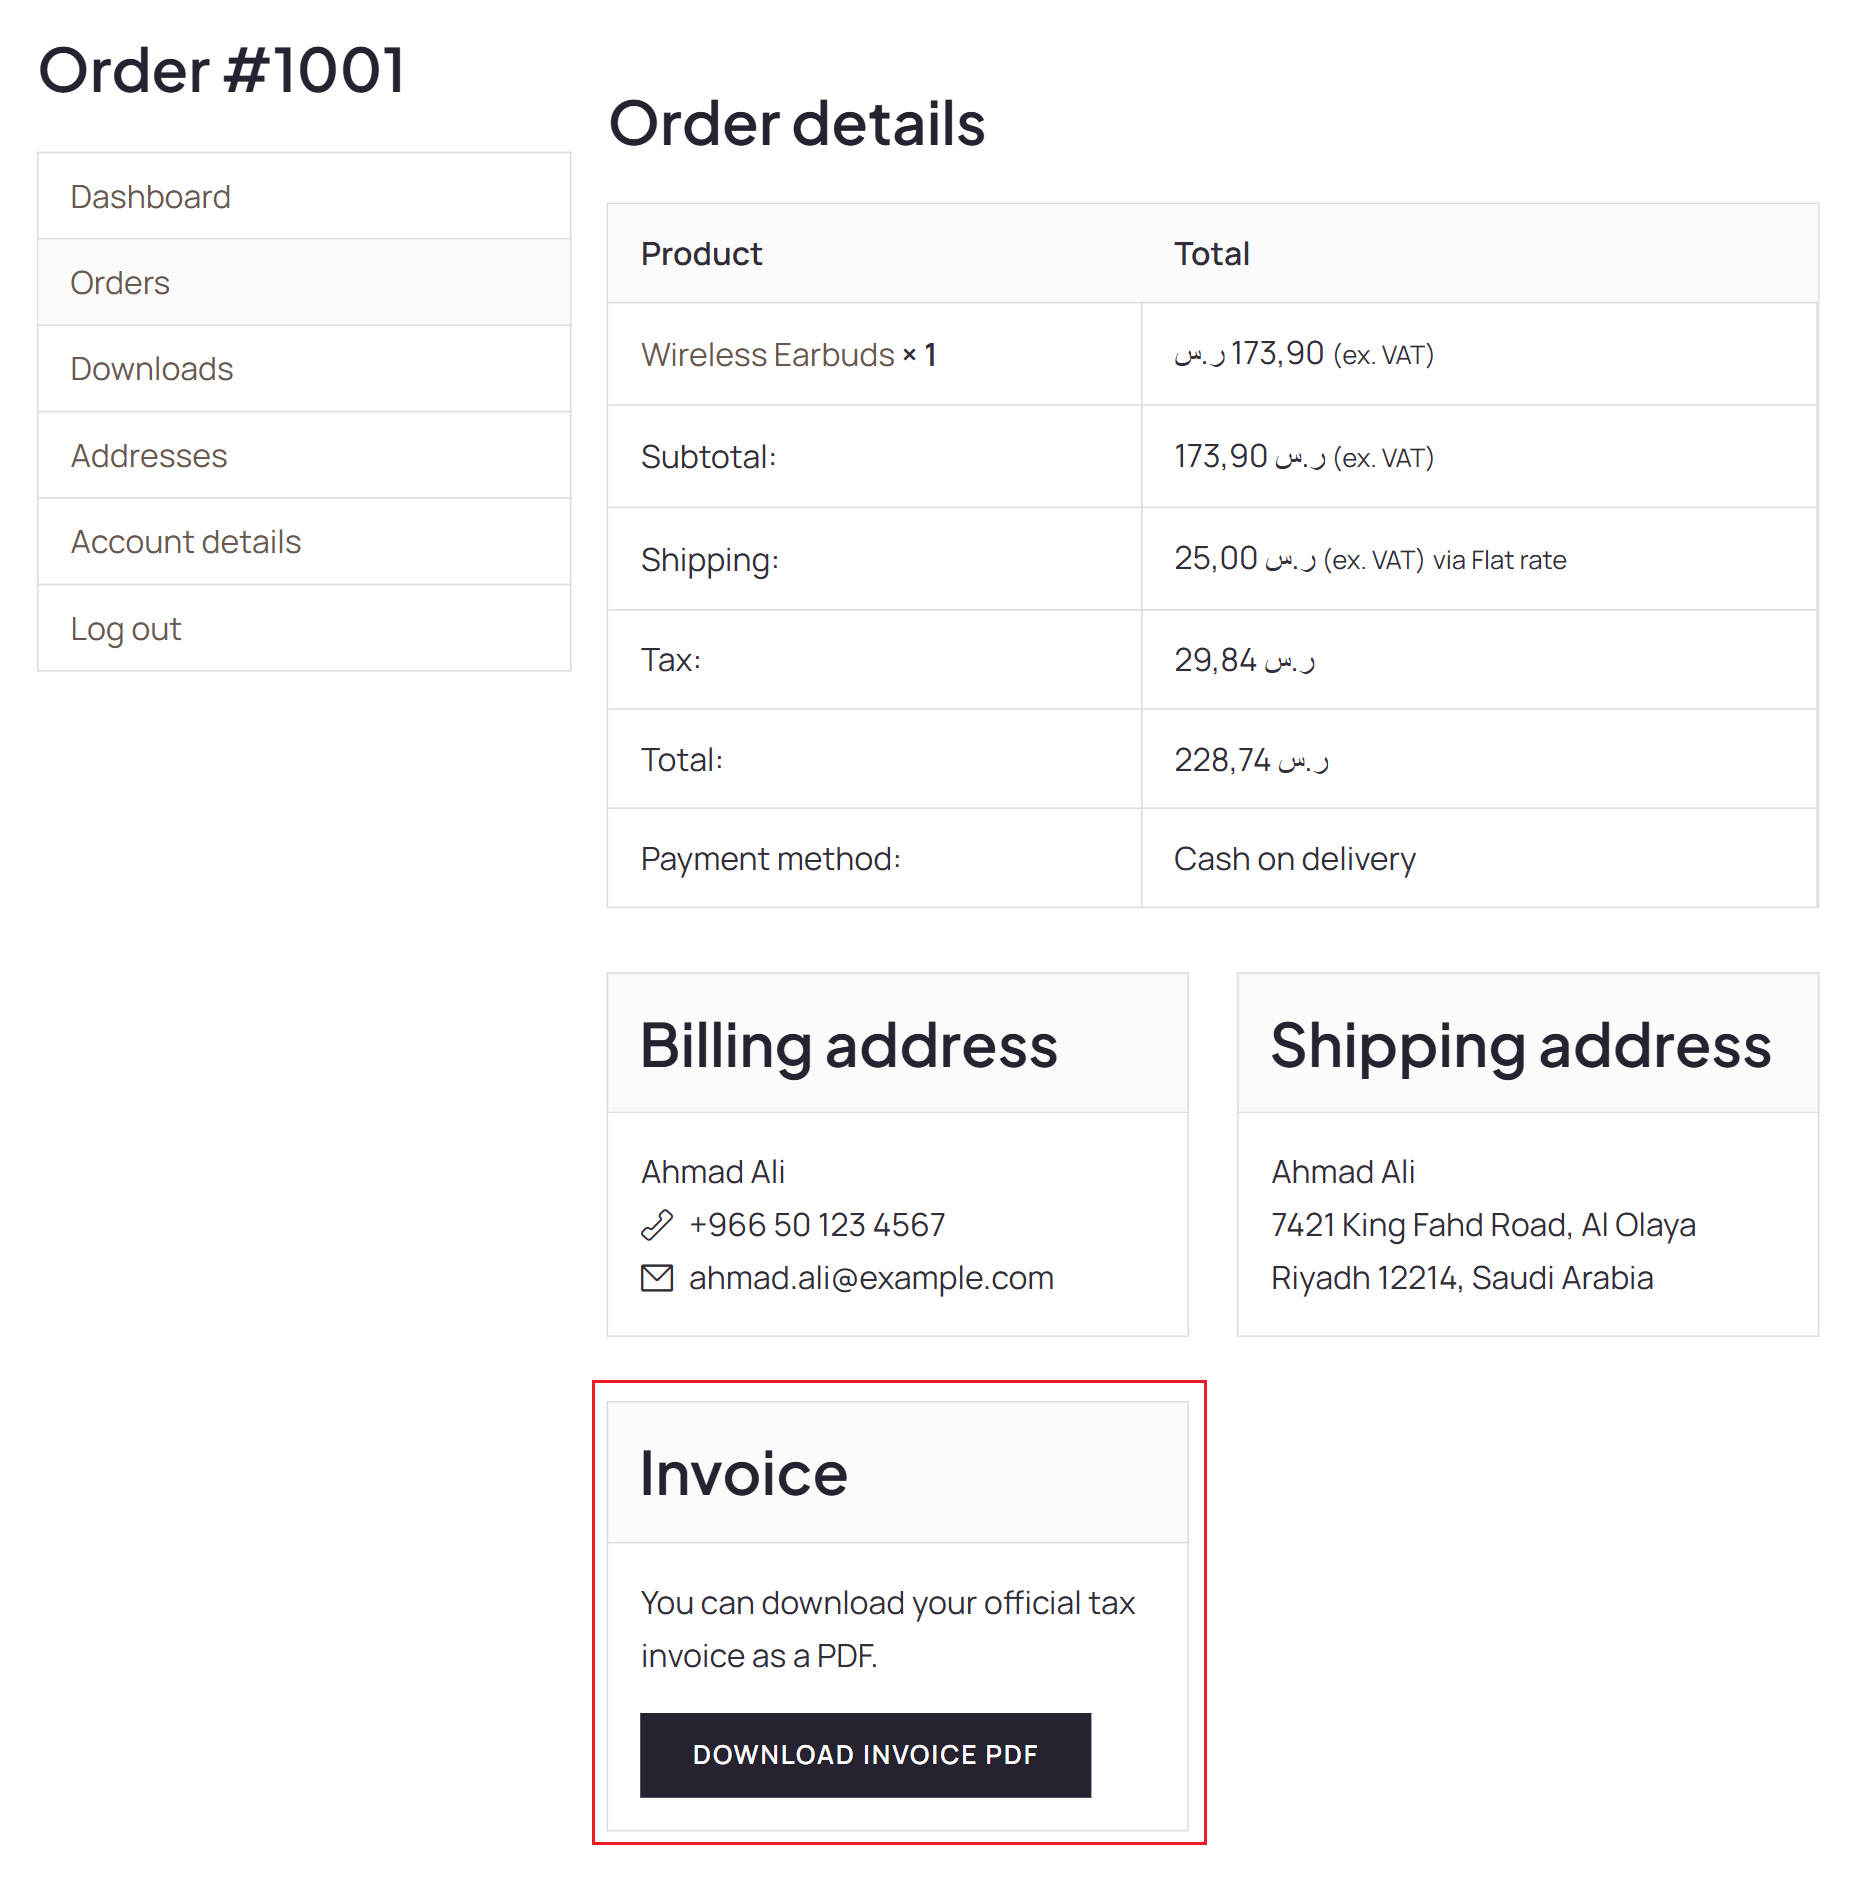
7.3 Invoice from the order details page
Customers can also download the invoice from the single order details page inside My Account. When an invoice is available for the order, an Invoice section appears below the order information with a download button for the PDF file.
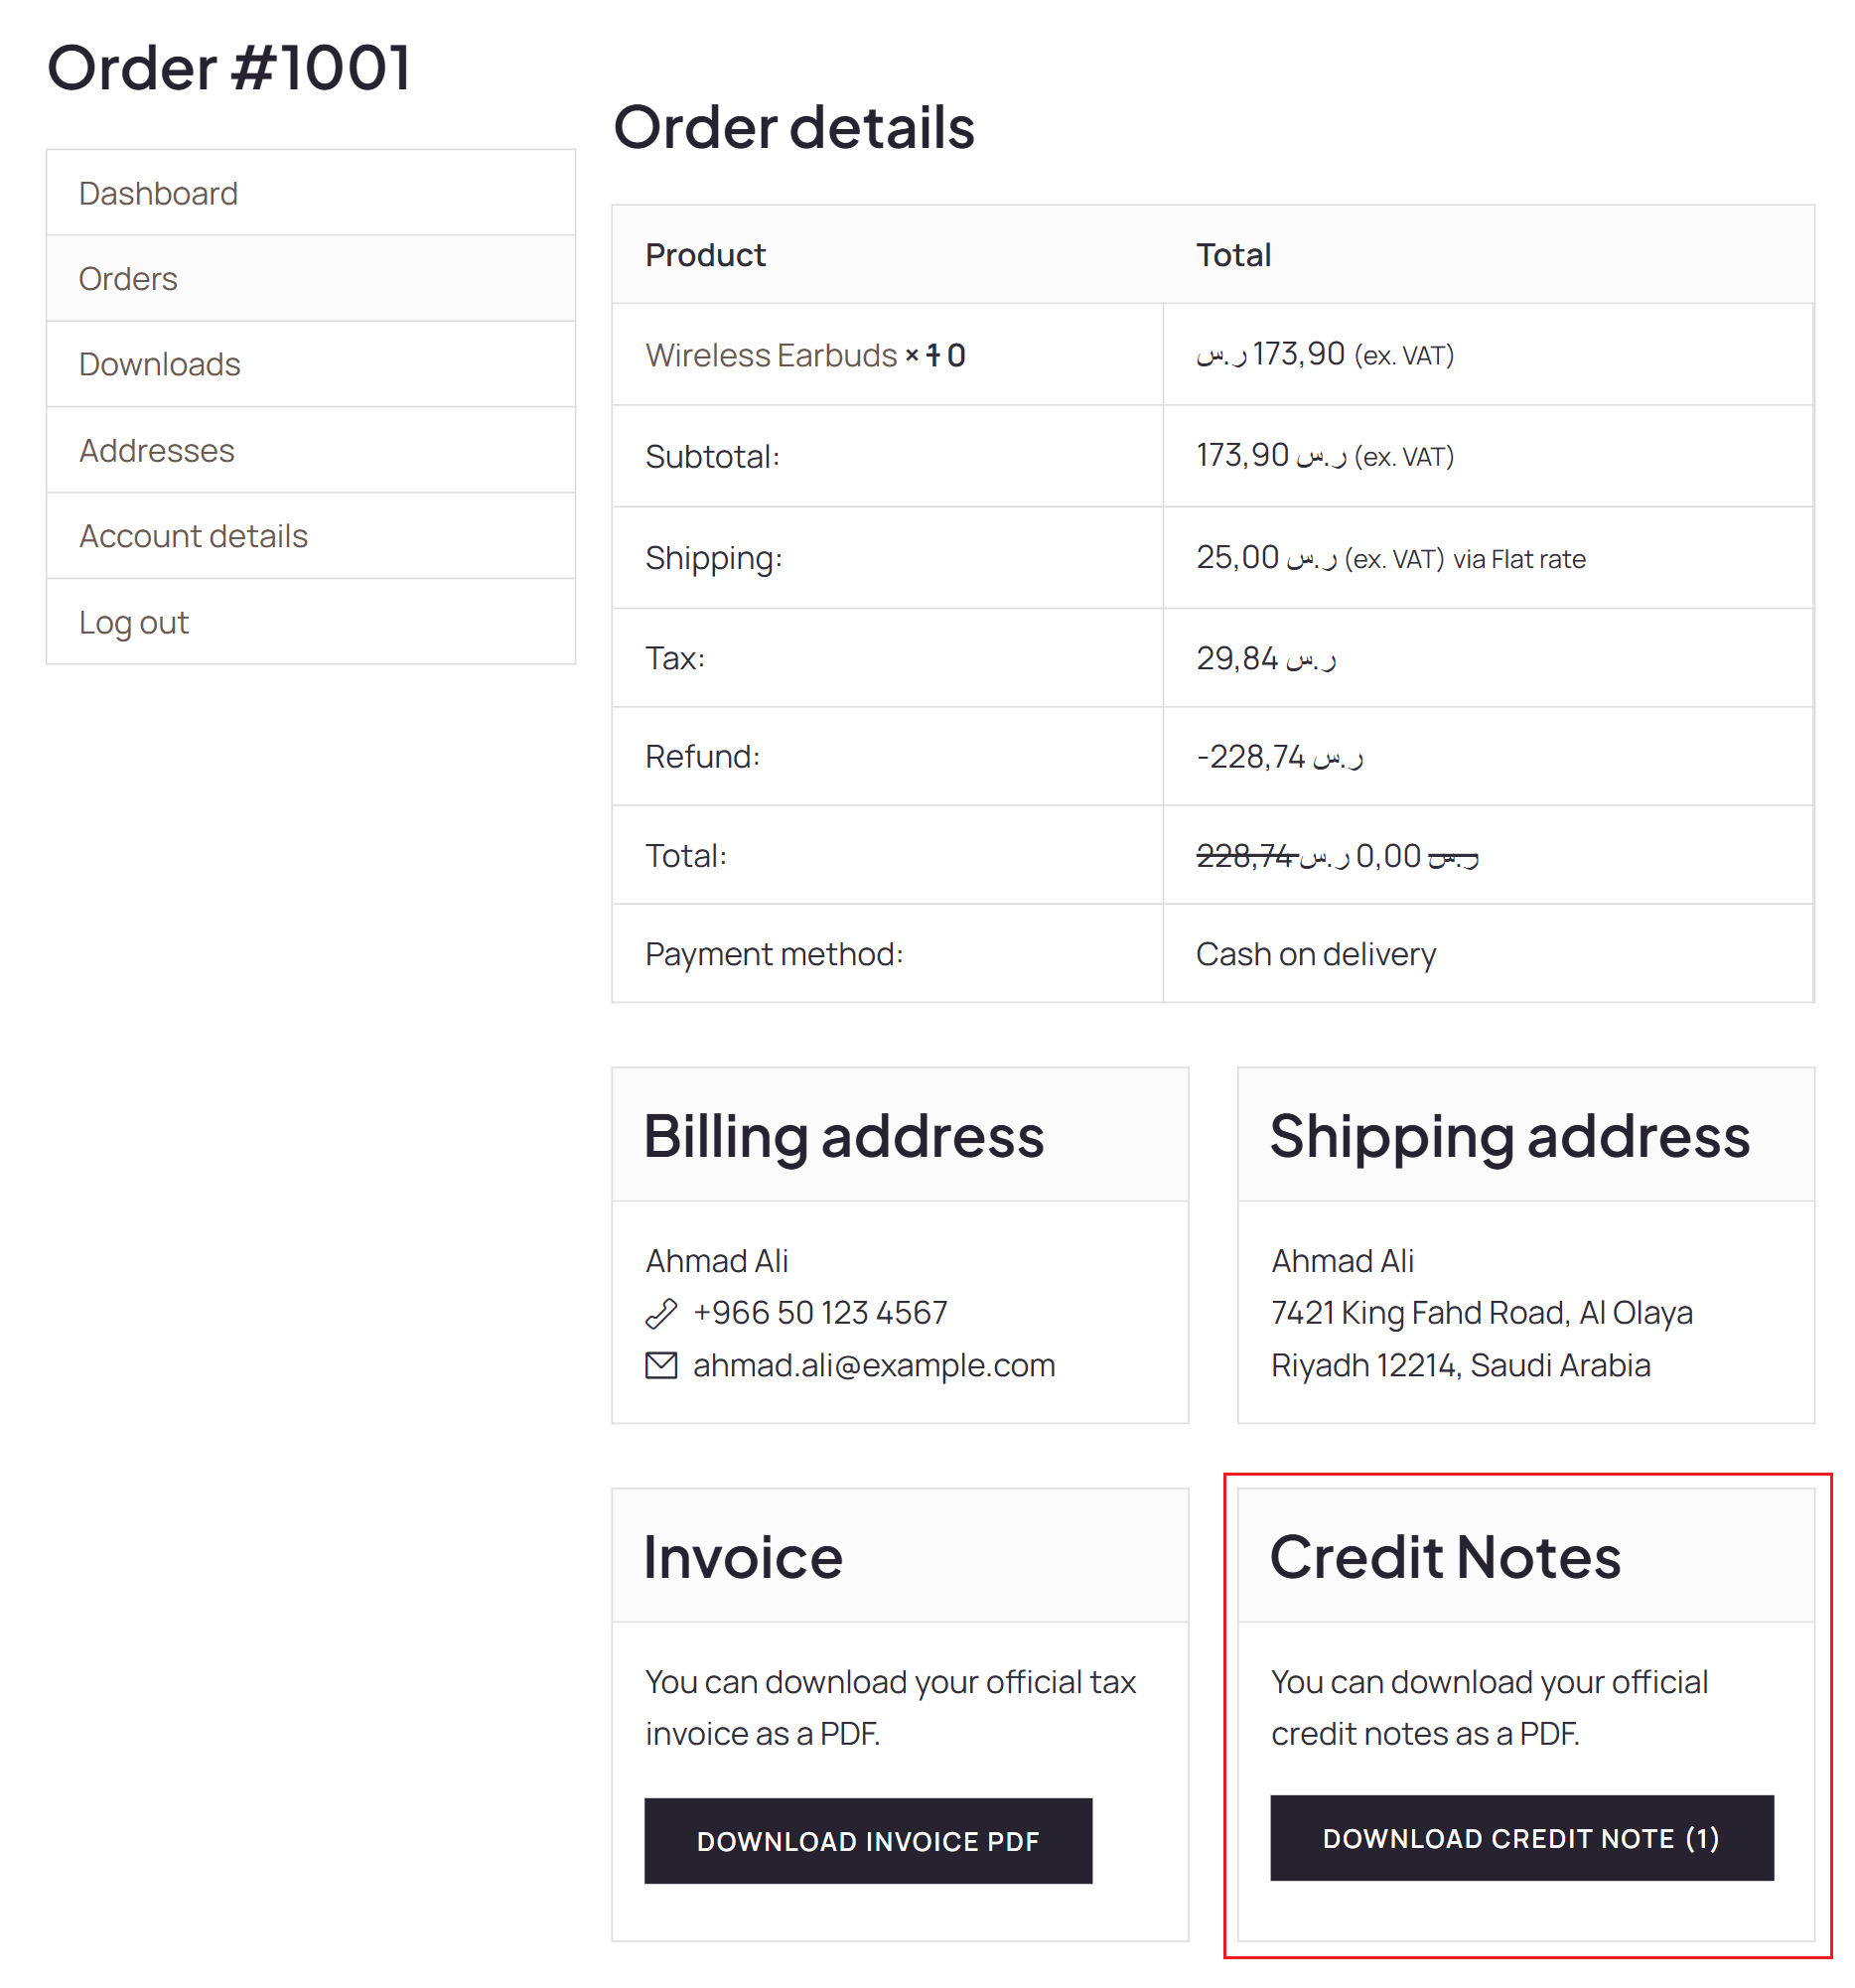
7.4 Credit note from the order details page
If an order includes a refund, customers can also download the related credit note from the single order details page inside My Account. When a credit note is available, a Credit Notes section appears on the same page with a download button for the generated PDF file.
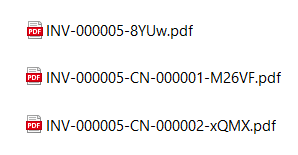
8. File Naming Convention
Generated PDF files use a clear naming pattern so invoices and credit notes can be identified easily. Each filename includes the invoice number, and credit note files also include the related credit note number. A short random suffix is added at the end of the filename to help keep each generated file unique.
- Invoice:
INV-000005-8YUw.pdf— includes the invoice number followed by a unique suffix. - Credit note:
INV-000005-CN-000001-M26VF.pdf— includes the related invoice number, the credit note identifierCN, the credit note number, and a unique suffix.
9. Sample PDF Output
9.1 Sample invoice PDF
This section shows an example of the invoice PDF generated by the plugin.

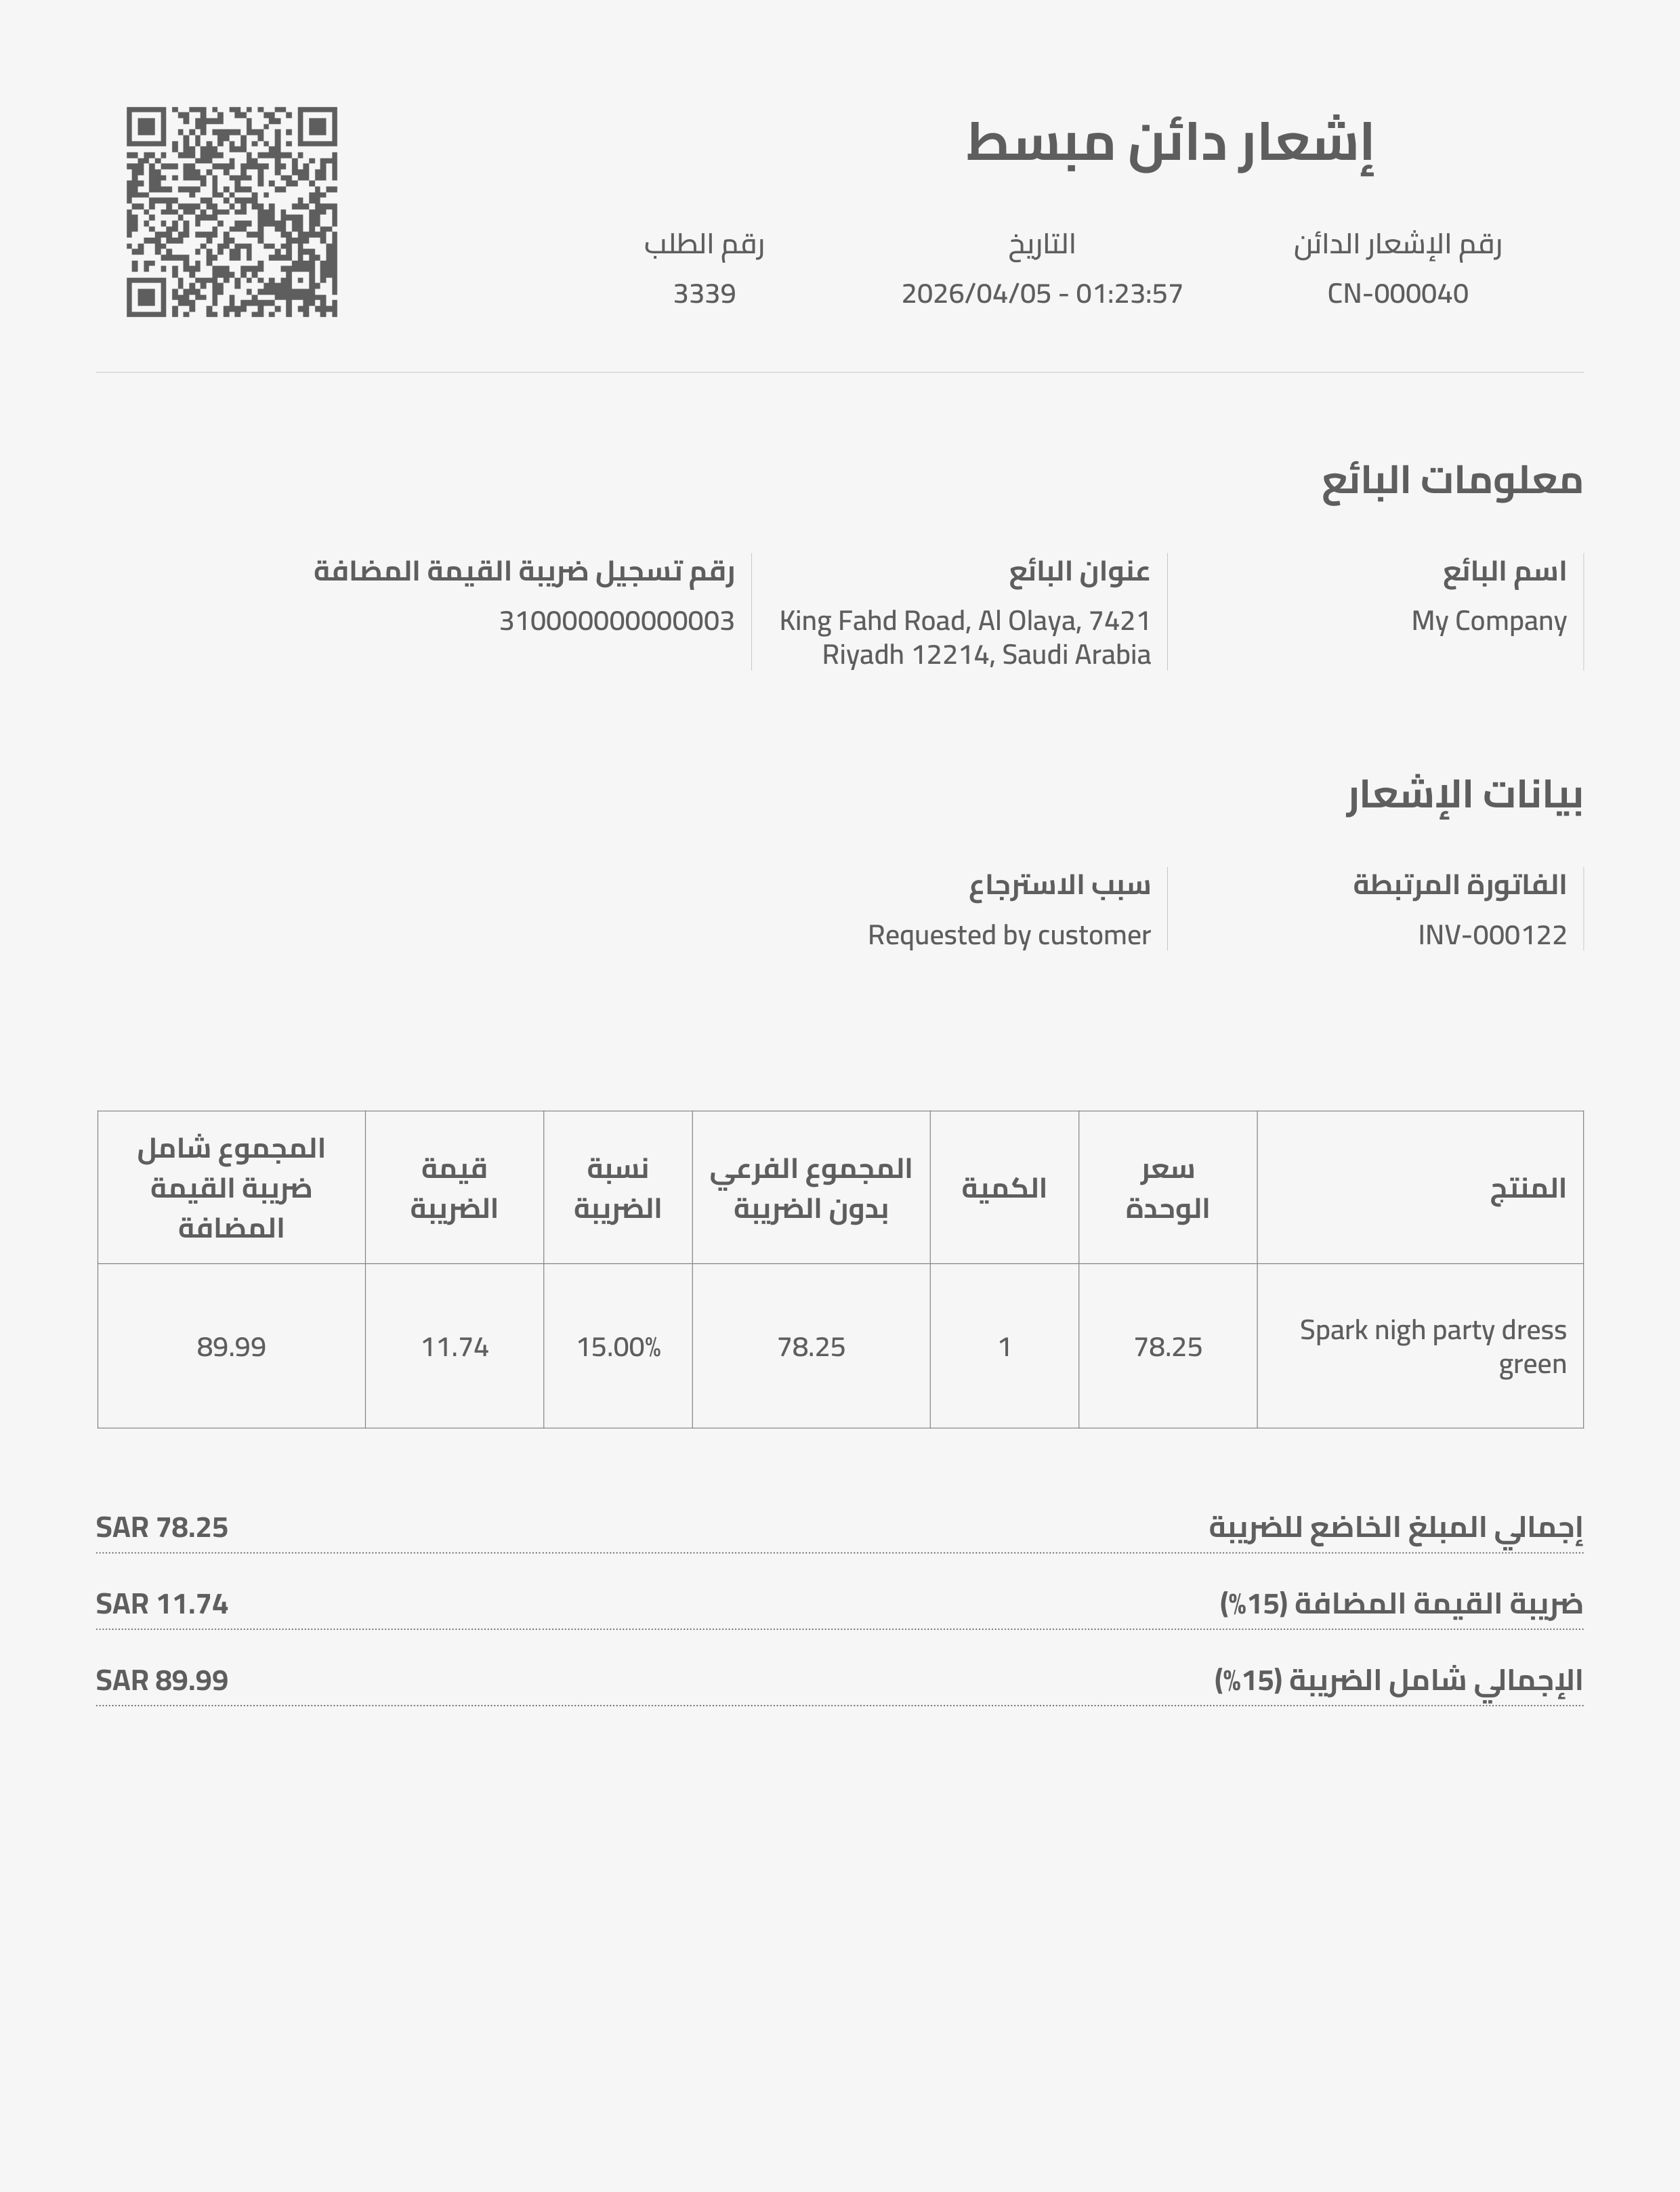
9.2 Sample credit note PDF
This section shows an example of the credit note PDF generated by the plugin.
10. Support
If you need help with installation, setup, or plugin usage, please contact support through the item support channel on CodeCanyon and include as many details as possible, such as your WordPress version, WooCommerce version, PHP version, and screenshots of the issue when available.